- Mark as New
- Bookmark
- Subscribe
- Mute
- Subscribe to RSS Feed
- Permalink
- Report Inappropriate Content
03-13-2023 05:47 AM
I have a customer who needs 4 cm x 7 cm (1.5 in x 2.75 in) custom sized stickers for some wedding favor candles, so I suggested that I use a 35.5 cm x 35.5 cm (14 inch by 14 inch) custom cut sticker to create 30 of the stickers (since you can only place 30 designs per sheet). My only concern is whether they will actually measure 4 x 7 cm. When I designed them in my external software I created the artboard at 4 cm x 7 cm but when I place them in Zazzle they blow up to a size that is approximately half the sheet. I used some math to size them down, figuring that I could fit 5 of them across the sheet (35.5 cm/7 cm = 5 cm), but I am concerned that the sizing may be off. Is there any way to be more precise with measurements with these stickers?
Solved! Go to Solution.
- Mark as New
- Bookmark
- Subscribe
- Mute
- Subscribe to RSS Feed
- Permalink
- Report Inappropriate Content
03-13-2023 08:06 PM - edited 03-13-2023 08:08 PM
I made a guide file for you if you want to try it.
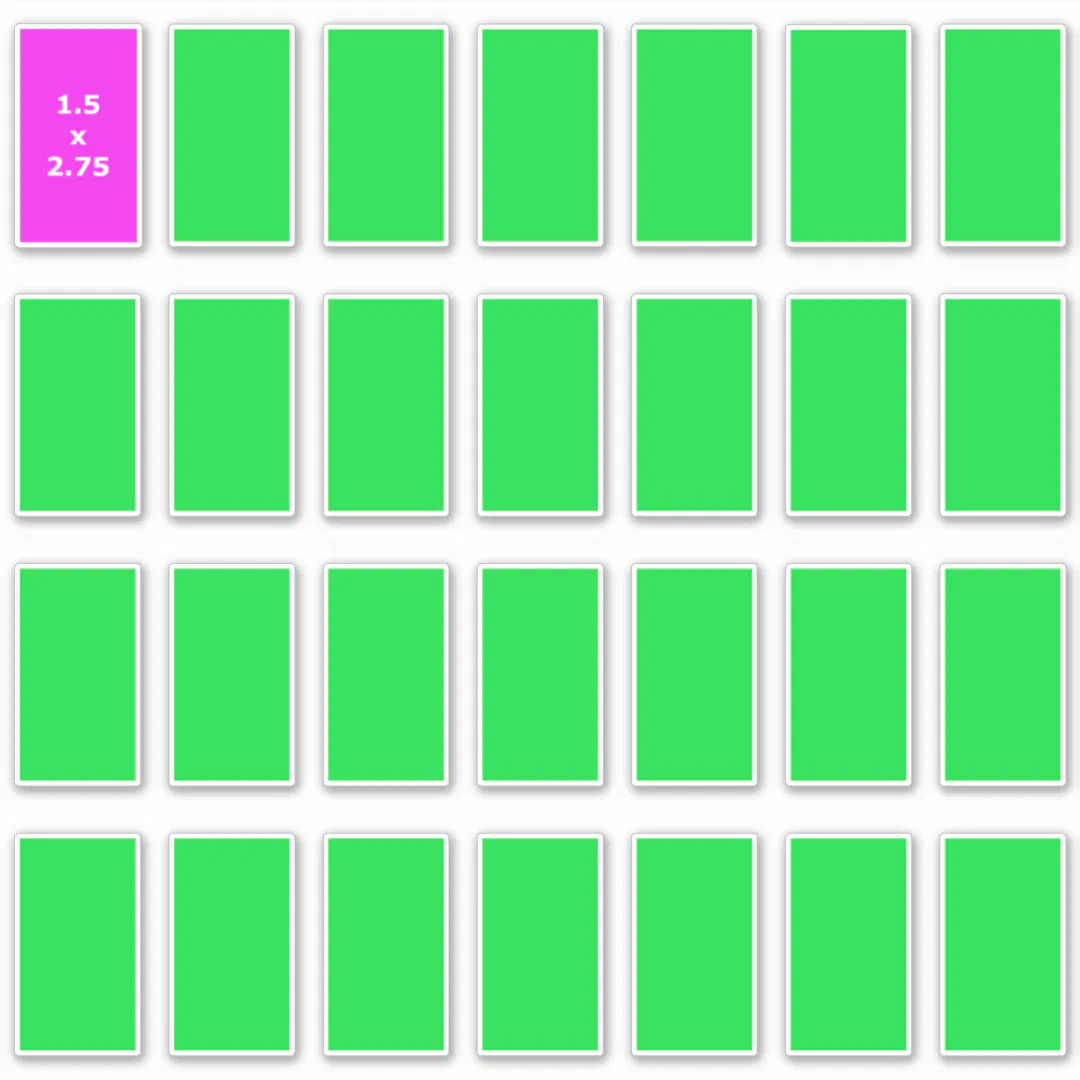
The product info notes they add 0.125" around each sticker. Adding that to your needed 1.5" x 2.75" size, the most full labels I could work out per 14" x 14" sheet was 28 (4 rows of 7).
It looks like this:

The whole image is 14" x 14" at 150ppi (though the ppi shouldn't matter at all here).
The blue grid lines are 0.125" wide, to ensure you have that gutter.
The black rectangles are the 1.5" x 2.75" label areas.
You can download the .psd file here.
You can download the flattened .png file here.
I uploaded the .png to a 14" x 14" sticker sheet blank and it automatically fit itself perfectly to the design area. Then I added a pink rectangle I had sized to 1.5" x 2.75" to test. That did pop in at a larger-than-wanted size but I just scaled it down to fit properly over one of the black rectangles. Here's the live demo:

- Mark as New
- Bookmark
- Subscribe
- Mute
- Subscribe to RSS Feed
- Permalink
- Report Inappropriate Content
03-13-2023 05:18 PM
I'm no expert, but what I would do is design the whole 14x14 size in Photoshop, upload it to fill the whole design area as a sample image for you to work off of, and then add your individual labels and line them up to match the sample image. Then delete the sample.
I'm interested if there is a better way also.
- Mark as New
- Bookmark
- Subscribe
- Mute
- Subscribe to RSS Feed
- Permalink
- Report Inappropriate Content
03-13-2023 06:33 PM
That is an excellent suggestion. Thank you!
- Mark as New
- Bookmark
- Subscribe
- Mute
- Subscribe to RSS Feed
- Permalink
- Report Inappropriate Content
03-13-2023 08:06 PM - edited 03-13-2023 08:08 PM
I made a guide file for you if you want to try it.
The product info notes they add 0.125" around each sticker. Adding that to your needed 1.5" x 2.75" size, the most full labels I could work out per 14" x 14" sheet was 28 (4 rows of 7).
It looks like this:
The whole image is 14" x 14" at 150ppi (though the ppi shouldn't matter at all here).
The blue grid lines are 0.125" wide, to ensure you have that gutter.
The black rectangles are the 1.5" x 2.75" label areas.
You can download the .psd file here.
You can download the flattened .png file here.
I uploaded the .png to a 14" x 14" sticker sheet blank and it automatically fit itself perfectly to the design area. Then I added a pink rectangle I had sized to 1.5" x 2.75" to test. That did pop in at a larger-than-wanted size but I just scaled it down to fit properly over one of the black rectangles. Here's the live demo:
- Mark as New
- Bookmark
- Subscribe
- Mute
- Subscribe to RSS Feed
- Permalink
- Report Inappropriate Content
03-14-2023 09:24 AM
@ColsCreationsYou are amazing! That's exactly what I was suggesting, except I didn't work it all out to compensate for the extra around the edges.
I think you could actually sell templates like these, on Etsy or somewhere, even for a nominal price like a couple bucks. I'd be interested in buying a couple specific templates for my next line of wedding accessories I'm planning to make- it would save me a ton of time!
- Mark as New
- Bookmark
- Subscribe
- Mute
- Subscribe to RSS Feed
- Permalink
- Report Inappropriate Content
03-14-2023 09:34 AM
@ColsCreations I agree! You are amazing!! Thank you so much for doing this! I agree with Connie that you could sell templates on Etsy or somewhere.
- Mark as New
- Bookmark
- Subscribe
- Mute
- Subscribe to RSS Feed
- Permalink
- Report Inappropriate Content
03-14-2023 10:19 AM
WAIT!
I just realized I made a mistake here. I should have doubled the interior "gutter" lines to 0.25 (instead of just the 0.125) to account for that space being needed for each side of adjoining stickers. I think there is likely enough space there as-is but I don't like to leave things to chance. I'm going to correct it later this evening and re-post the file.
- Mark as New
- Bookmark
- Subscribe
- Mute
- Subscribe to RSS Feed
- Permalink
- Report Inappropriate Content
03-14-2023 10:30 AM
Thank you @ColsCreations . I will wait until you upload the updated file. No rush!
- Mark as New
- Bookmark
- Subscribe
- Mute
- Subscribe to RSS Feed
- Permalink
- Report Inappropriate Content
03-14-2023 09:51 PM
There was plenty of space on my first template but I re-did it anyway to make it better and easier to use.
Here's a demo of it:
- Mark as New
- Bookmark
- Subscribe
- Mute
- Subscribe to RSS Feed
- Permalink
- Report Inappropriate Content
03-15-2023 09:41 AM
Thank you very much! One suggestion for future reference- if the first rectangle was made a Smart Object and then copied 27 more times, you could Replace the Contents of ONE, and they would all update at once.
- Mark as New
- Bookmark
- Subscribe
- Mute
- Subscribe to RSS Feed
- Permalink
- Report Inappropriate Content
03-15-2023 09:52 AM
Great idea @Connie !!
- Mark as New
- Bookmark
- Subscribe
- Mute
- Subscribe to RSS Feed
- Permalink
- Report Inappropriate Content
03-15-2023 12:42 PM
Yes! I learned that accidentally making this template. In my psd file the "Label Guides" layer group is exactly that way. Replace one and all 28 change. The other layer group, where you add the actual design for each sticker, I purposefully "disconnected" from each other so that you can replace them individually as I wasn't sure whether @albamarie was wanting to make all 28 labels the same or not.
Which reminds me, just a thought I had, but if this was my sale I would use sticker #28 as a designer credit / shout-out back to my store with a logo and QR code.
Re selling templates on Etsy - thanks for the suggestion and vote of confidence! Something like that would be right up my alley. I'm a lefty and enjoy messing around making designs to sell and every sale delights me, but figuring out things like this that are more tactical/analytical bring me a lot of satisfaction. And I do actually have two Etsy accounts/stores I opened long ago just to "reserve" the store names for future use. Maybe the future has arrived.
- Mark as New
- Bookmark
- Subscribe
- Mute
- Subscribe to RSS Feed
- Permalink
- Report Inappropriate Content
03-21-2023 12:28 PM
Oh, OK. I didn't use the Label Guides Group, because it doesn't work for me. I have a bug in my Photoshop CS5 that sometimes opens Smart Objects as PNG instead of PSB, and of course that means I can't save it to update the master file. For some reason the Label Guides Group opens like that, but the other Labels Group opens properly as PSB. I haven't been able to figure out what triggers this bug- it's even happened to me on my OWN Smart Objects that I made on this computer with this version of Photoshop! In fact, I sent one of my files to someone else that also has CS5, and it worked fine for him, so it must be something right in my Photoshop or my computer. But I haven't taken the time to uninstall and reinstall the whole Creative Suite, and have to re-do all my preferences.
Yes please to resurrect those old Etsy stores for Zazzle templates! Wedding Guest Address Labels would be a good idea to start with, along with these labels above.
- Mark as New
- Bookmark
- Subscribe
- Mute
- Subscribe to RSS Feed
- Permalink
- Report Inappropriate Content
03-15-2023 09:52 AM
Thank you!!!
- Mark as New
- Bookmark
- Subscribe
- Mute
- Subscribe to RSS Feed
- Permalink
- Report Inappropriate Content
03-20-2023 04:57 AM
Thank you for taking the time and doing this and also explaining! 😊 This is the only thread where I was able to have my question answered. It was very helpful and I would up making my own template but now I understand. Agree with the others that you could sell these!
